
| 일 | 월 | 화 | 수 | 목 | 금 | 토 |
|---|---|---|---|---|---|---|
| 1 | 2 | 3 | 4 | 5 | ||
| 6 | 7 | 8 | 9 | 10 | 11 | 12 |
| 13 | 14 | 15 | 16 | 17 | 18 | 19 |
| 20 | 21 | 22 | 23 | 24 | 25 | 26 |
| 27 | 28 | 29 | 30 |
- 컨트롤러
- 3D 프린터
- Mac
- high sierra
- IOS
- 버그
- macos
- 맥
- 애플
- 모하비
- asahi
- 3D프린터
- sierra
- 아이폰
- Linux
- asahi linux
- mojave
- 맥북프로
- AirPods
- 에어팟
- Fedora
- tevo
- Tarantula
- 업데이트
- beta
- catalina
- iOS 13
- 시에라
- 터치바
- 정식버전
- Today
- Total
elsa in mac
wezterm 의 multiplexing 기능을 사용해 보자. 본문

이번 포스트에서는 wezterm 터미널 에뮬레이터의 mutiplexing 기능을 설정하는 법을 알아보도록 하겠습니다.
wezterm 은 10년 이상 Facebook에서 수석 소프트웨어 엔지니어로 일했으며, KumoMTA의 공동 설립자이자 PHP분야의 전문가인 wez furlong이 2018년 부터 개발해 오고 있는 GPU 가속기능을 가진 multi-platform Terminal Emulator 입니다.
앞선 포스트에서도 언급했듯이, wezterm의 가장 강력한 장점 중 하나는 자체적으로 multiplexer 기능을 갖추고 있다는 점 입니다. 이는 tmux를 대처할 만큼 강력하고 편리합니다. 10여년 이상 tmux를 사용해 온 필자도 wezterm을 기본 터미널로 사용하기 시작하면서 tmux를 내렸습니다.
kitty나 item2 와 같은 많은 사용자 층을 갖고 있는 지명도 높은 터미널들에 비해 낮은 인지도를 갖고 있지만, 그 가능성을 확인한다면 그 어떤 터미널 에뮬레이터보다 많은 장점을 가지고 있다는 것을 알 수 있지요.
이번 포스트에서는 wezterm 설정 중 multiplexing 기능과 관련된 설정을 간단히 알아보도록 하겠습니다.
우선, wezterm의 설정 파일은 ~/.wezterm.lua 입니다. 설정은 lua 스크립트 언어로 정의합니다.
가장 초기 부터 단계적으로 설정을 해 봅니다.
local wezterm = require 'wezterm'

return config;
confing 요소를 추가하기 위해 config 변수를 정의해 줍니다.
local wezterm = require 'wezterm'
local config = wezterm.config_builder()

return config;
다음으로, 터미널의 기본적인 외형을 설정해 봅니다. lua 스크립트 언어의 주석은 -- 입니다.
local wezterm = require 'wezterm'
local config = wezterm.config_builder()

config.front_end = "WebGpu"
config.aimation_fps = 60


config.window_decorations = "NONE"
config.window_background_opacity = 0.3

return config;
front_end는 redering을 사용할 front-end를 정의하는 것으로, OpenGL, Software, WebGpu 중 선택할 수 있습니다. 기본 값은 WebGpu 입니다. Software로 정의하면 CPU가 rendering을 담당합니다. animation_fps는 얼마나 부드럽게 화면을 변화 시킬 것인가에 대한 것으로 기본 값은 10fps 입니다.
여기서, 자신이 GPU 환경에 정확히 설정할 필요가 있습니다. 우선, wezterm 터미널을 띄우고, CTRL-SHIFT-L 키를 눌러 줍니다. 그럼 화면이 아래와 같이 변경됩니다.
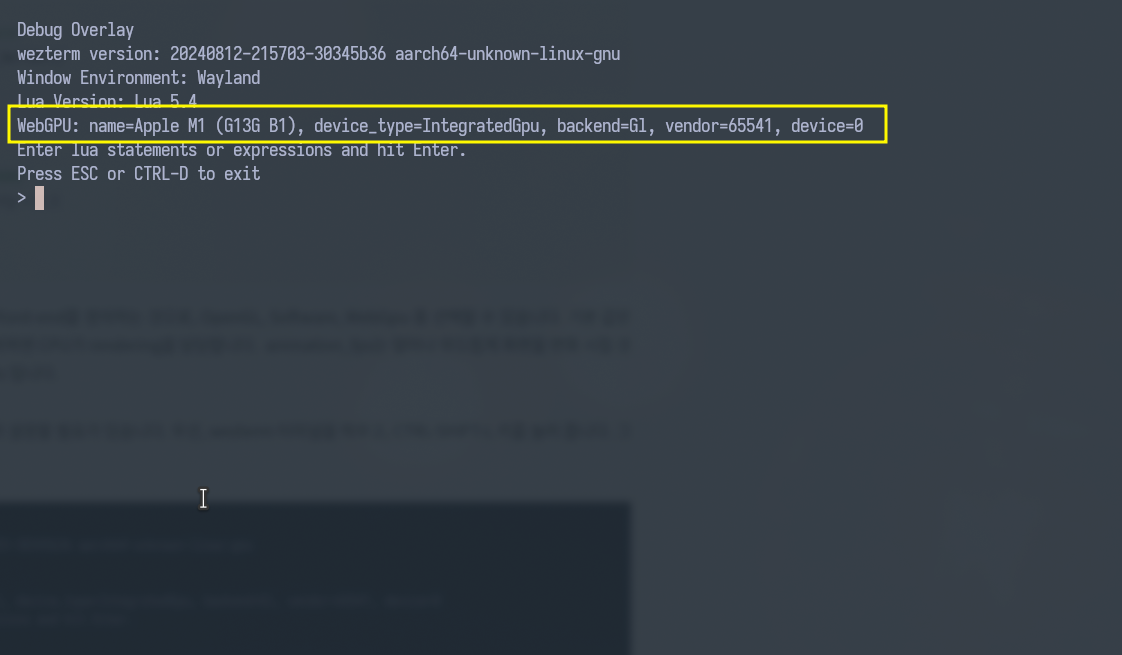
위의 스샷을 보면, WebGPU가 IntegretedGPU를 backend로 사용하고 있는 것을 알 수 있습니다.
프롬프트에 wezterm.gui.enumerate_gpus() 를 키인하고 enter키를 처 줍니다. 그럼, 아래와 같이 wezterm이 인식한 GPU Device에 대한 목록이 나오게 됩니다.
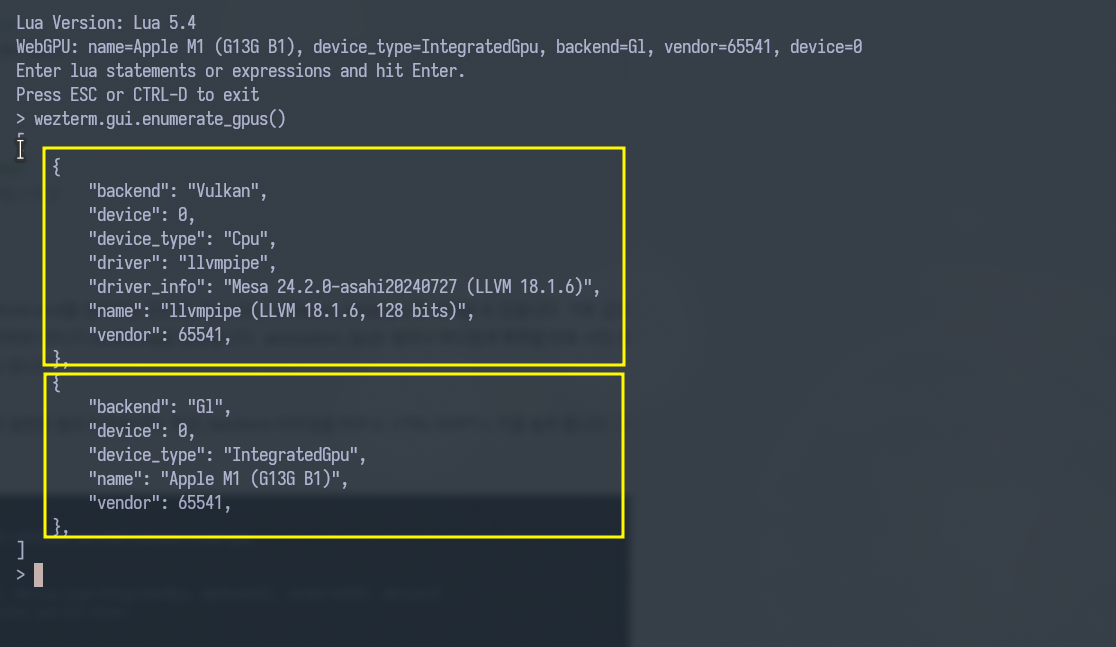
위의 예를 보면, 2개의 항목이 있고, 첫번째 것은 Vulkan backend를 이용하지만, llvmpipe를 이용하므로 이것은 Software rendering 이라는 것을 알 수 있습니다. 두 번째는 G1 backend 이고, 내장 GPU를 이용합니다. 따라서, 두 번째 항목을 이용해야, 실질적인 Hardware 가속 기능을 사용할 수 있다는 것을 알 수 있습니다. 보기에는 1번 항목이 Vulkan 이고, 2번 항목이 G1 으로 보이지만, enumetation 에서 어떤것이 첫번째로 잡힐지는 아직 알 수 없습니다. 여기서 확인하는 이유는 외장 GPU를 사용하는 사용자의 경우, 추가적으로 항목이 더 있을 수 있고, 사용자는 어떤 GPU를 backend로 사용할 지를 확실하게 설정할 필요가 있다는 점 입니다.
이제, 아래와 같이 config.webgpu_prefered_adapper 설정항목을 이용하여, 어떤 backend를 사용할지를 설정해야 합니다.
local wezterm = require 'wezterm'
local config = wezterm.config_builder()

local gpus = wezterm.gui.enumerate_gpus()
config.webgpu_preferred_adapter  = gpus[0]
config.front_end = "WebGpu"
config.aimation_fps = 60

config.window_decorations = "NONE"
config.window_background_opacity = 0.3

return config;
위의 예에서는 gpus[0]로 설정을 했는데, 설정을 한 후, wezterm을 종료 후 다시 실행하고 CTRL+SHIFT+L로 확인을 다시 해야 합니다. 만약 자신이 생각하는 backend로 설정이 되지 않았다면, 1, 2 등 다른 숫자를 넣고, 저장 후 다시 반복적으로 확인해야 합니다.
만일, 내장 GPU(integreted GPU) 뿐만 아니라, 외장 GPU가 설치되어 있고, 외장 GPU(discrete GPU)을 사용하고자 한다면, 추가적으로 comfig.webgpu_power_preference = "HighPerformance" 를 설정해야 합니다.
window_decorations 는 NONE, TITLE, RESIZE 중 선택할 수 있으며, title bar의 표시 유무를 설정합니다. NONE과 RESIZE는 title bar를 숨기며, TITLE은 title bar를 표시 합니다. RESIZE는 title bar를 표시하지 않지만, border를 마우스 포인트로 창의 크기를 조절할 수 있습니다.
background_opacity 는 배경 투명도를 설정 합니다. 위의 예에서는 30%로 설정한 것을 알 수 있습니다.
local wezterm = require 'wezterm'
local config = wezterm.config_builder()

local gpus = wezterm.gui.enumerate_gpus()
config.webgpu_preferred_adapter  = gpus[0]
config.front_end = "WebGpu"
config.aimation_fps = 60

config.window_decorations = "NONE"
config.window_background_opacity = 0.3

config.enable_tab_bar = false
config.warn_about_missing_glyphs = false
config.window_close_confirmation = "NeverPrompt"

return config;
enable_tab_bar 는 tab bar의 표시 여부를 설정합니다.
warn_about_missing_glyphs 는 글꼴에 따라 표시할 glyph를 표시할 수 없을 때, 경고창을 표시할 것인가의 여부를 설정합니다.
window_close_confirmation은 window 창을 닫을 때, 창 종료 확인 prompt를 표시할 것인지의 여부를 설정합니다. AlwaysPrompt 또는 NeverPrompt 중 선택 하면 됩니다.
local wezterm = require 'wezterm'
local config = wezterm.config_builder()

local gpus = wezterm.gui.enumerate_gpus()
config.webgpu_preferred_adapter  = gpus[0]
config.front_end = "WebGpu"
config.aimation_fps = 60

config.window_decorations = "NONE"
config.window_background_opacity = 0.3

config.enable_tab_bar = false
config.warn_about_missing_glyphs = false
config.window_close_confirmation = "NeverPrompt"

config.window_padding = {
  left   = '20px',
  right  = '20px',
  top    = '20px',
  bottom = '50px',
}

return config;
widnow_padding은 wezterm 윈도우 창의 외각에서 얼마의 GAP을 주고 정보를 표시할 것인지를 설정합니다. 위의 설정을 보면, 왼쪽/오른쪽/상단은 20 pixel , 그리고 하단은 50 pixel 의 gap 을 주고 있음을 알 수 있습니다.
local wezterm = require 'wezterm'
local config = wezterm.config_builder()

local gpus = wezterm.gui.enumerate_gpus()
config.webgpu_preferred_adapter  = gpus[0]
config.front_end = "WebGpu"
config.aimation_fps = 60

config.window_decorations = "NONE"
config.window_background_opacity = 0.3

config.enable_tab_bar = false
config.warn_about_missing_glyphs = false
config.window_close_confirmation = "NeverPrompt"

config.window_padding = {
  left   = '20px',
  right  = '20px',
  top    = '20px',
  bottom = '50px',
}

local custom_catppuccin      = wezterm.color.get_builtin_schemes()["Catppuccin Macchiato"]
custom_catppuccin.background = '#293643'
config.color_schemes         = { ['Custom_Catpuccin'] = custom_catppuccin }
config.color_scheme          = 'Custom_Catpuccin'

return config;
다음은 theme 입니다.
위의 코드를 보면, Catppuccin Macchiato 테마를 사용합니다. 테마를 수정 없이 그래도 사용한다면, 위의 같이 복잡하게 설정할 필요 없이 config.color_scheme = 'Catppuccin Macchiato' 이렇게만 설정하면 됩니다만, 위의 코드는 해당 테마를 사용하면서 테마의 일부 속성값을 변경할 때의 코드 예시로, background 컬러만 별도로 수정하고 있음을 알 수 있습니다.
local wezterm = require 'wezterm'
local config = wezterm.config_builder()

local gpus = wezterm.gui.enumerate_gpus()
config.webgpu_preferred_adapter  = gpus[0]
config.front_end = "WebGpu"
config.aimation_fps = 60

config.window_decorations = "NONE"
config.window_background_opacity = 0.3

config.enable_tab_bar = false
config.warn_about_missing_glyphs = false
config.window_close_confirmation = "NeverPrompt"

config.window_padding = {
  left   = '20px',
  right  = '20px',
  top    = '20px',
  bottom = '50px',
}

local custom_catppuccin      = wezterm.color.get_builtin_schemes()["Catppuccin Macchiato"]
custom_catppuccin.background = '#293643'
config.color_schemes         = { ['Custom_Catpuccin'] = custom_catppuccin }
config.color_scheme          = 'Custom_Catpuccin'

config.font = wezterm.font (
  'Sarasa Mono K Nerd Font',
  {
    weight='Regular',
    italic = false
  }
}
config.font_size = 15
config.cell_width = 0.9
config.line_height = 1.05

return config;
다음은 폰트 입니다.
위의 예에서는 Sarasa Mono K Nerd Font를 설정하고 있는데, weight를 Regular, 그리고, italic 은 사용하지 않은 설정 입니다. font 속성은 굉장히 많은 설정 항목들이 있는데, wezterm에서는 한글과 영문을 각각 별도의 font로 설정할 수 있습니다.
한글과 영문 폰트를 혼용하려면, config.font = ... 대신에, 아래와 같이 font_with_fallback { ... 으로 font를 설정하면 됩니다.
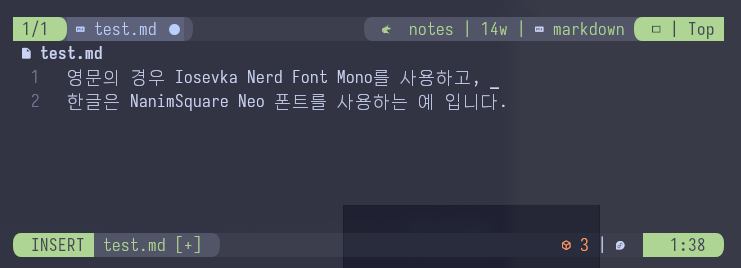
config.font = wezterm.font_with_fallback {
  { family='Iosevka Nerd Font Mono', weight='Light', scale=1.0, },
  { family='NanumSquare Neo', weight='Light', },
}
위의 예는 영문의 경우 Iosevka Nerd Font Mono를 사용하고, 한글은 NanumSquare Neo 폰트를 사용하는 것을 알 수 있습니다.
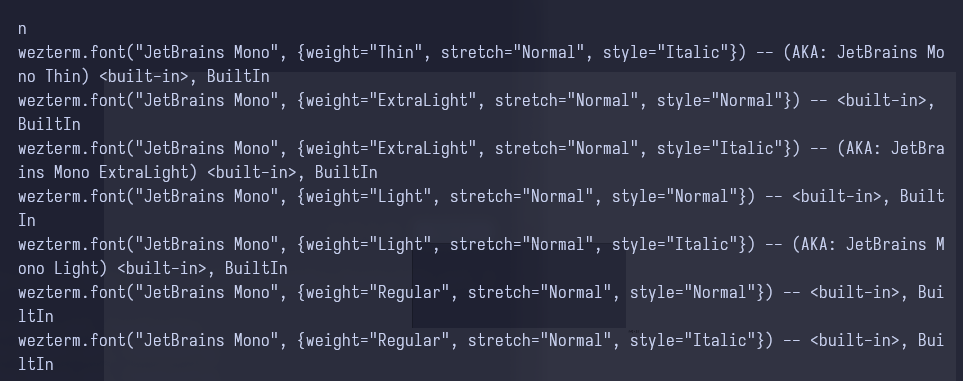
font 이름은 terminal 에서 wezterm ls-fonts --list-system 명령으로 확인할 수 있습니다.
자 이제, 드디어 multiplexing 기능을 정의할 차례 입니다. wezterm은 자체적으로 mux 가능을 가지고 있고 기본 활성화 되어 있기 때문에, 관련된 keymap만 설정하면 간단하게 사용할 수 있습니다. 역사적으로 terminal emulator에서 multiplexing 기능을 사용하는 가장 대표적인 방법은 tmux를 사용하는 것이지만, 역사가 오래 된 만큼 관련된 정보들이 버전별로 혼재해 있기 때문에, 최근에 tmux를 새롭게 사용하고자 하는 사용자들에겐 설정의 어려움이 높다는 단점이 있습니다. 대신, 장점이라면 어떤 Terminal Emulator를 사용하던 상관없이 공통적으로 mux 기능을 사용할 수 있다는 점입니다. 선택은 여러분의 몫 입니다. 물론, wezterm에서도 자체 multiplexing 기능을 사용하지 않고, tmux를 사용할 수 있습니다.
위의 코드는 더 이상 중복을 하지 않고 추가하는 코드만 예시로 넣겠습니다.
우선은 multiplexing 기능을 호출하기 위한 leader 키를 설정합니다.
:
:
local act = wezterm.action
config.leader = { mods = "CTRL", key = "b", timeout_milliseconds = 2000 }

return config;
control+B 키를 눌러 multiplexing 기능을 호출한다고 설정을 합니다.(ctrl+B는 tmux의 기본 prefix key 입니다) timeout_milliseconds를 2000즉, 2초로 설정을 했으므로, ctrl+B를 누르고, 후속 키를 2초 안에 눌러야 한다는 의미가 됩니다.
wezterm.action 을 act로 선언하여, 코드를 쉽게 작성하도록 합니다.
:
:
local act = wezterm.action

config.leader = { mods = "CTRL", key = "b", timeout_milliseconds = 2000 }
config.keys   = {
  { mode = "LEADER", key = "'", action = act.SplitVertical { domain = "CurrentPaneDomain" } },
}

return config;
config.keys 로 첫번째 항목을 정의합니다. Leader 키를 누른 후, 2초 안에 '(quotation)키를 누르면, 현재의 pane을 세로로 2분할 한다는 설정 입니다.
:
:
local act = wezterm.action

config.leader = { mods = "CTRL", key = "b", timeout_milliseconds = 2000 }
config.keys   = {
  { mode = "LEADER", key = "'", action = act.SplitVertical   { domain = "CurrentPaneDomain" } },
  { mode = "LEADER", key = ";", action = act.SplitHorizontal { domain = "CurrentPaneDomain" } },

return config;
마찬가지로, Leader 키를 누르고 2초 안에 ;(semi-colon) 키를 누르면, 현재의 pane을 가로로 2분할 한다는 설정 입니다.
아래는 동작 영상 입니다.
:
:
local act = wezterm.action

config.leader = { mods = "CTRL", key = "b", timeout_milliseconds = 2000 }
config.keys   = {
  { mode = "LEADER", key = "'", action = act.SplitVertical    { domain = "CurrentPaneDomain" } },
  { mode = "LEADER", key = ";", action = act.SplitHorizontal  { domain = "CurrentPaneDomain" } },
  { mods = "LEADER", key  = "x",action = act.CloseCurrentPane { confirm = false              } },
}

return config;
pane을 분할 했다면, 분할된 pane을 닫을 수도 있어야 합니다.
Leader + x 를 하면, 현재의 pane을 닫게 됩니다. confirm 을 false로 선언하면, 종료 시 물어보지 않고 그냥 바로 닫아 버립니다.
:
:
local act = wezterm.action

config.leader = { mods = "CTRL", key = "b", timeout_milliseconds = 2000 }
config.keys   = {
  { mode = "LEADER", key = "'",           action = act.SplitVertical    { domain = "CurrentPaneDomain" } },
  { mode = "LEADER", key = ";",           action = act.SplitHorizontal  { domain = "CurrentPaneDomain" } },
  { mods = "LEADER", key  = "x",          action = act.CloseCurrentPane { confirm = false              } },
  { mods = "LEADER", key  = "LeftArrow",  action = act.ActivatePaneDirection "Left"  },
  { mods = "LEADER", key  = "RightArrow", action = act.ActivatePaneDirection "Right" },
  { mods = "LEADER", key  = "UpArrow",    action = act.ActivatePaneDirection "Up"    },
  { mods = "LEADER", key  = "DownArrow",  action = act.ActivatePaneDirection "Down"  },
}

return config;
위의 코드는 Leader + 방향키 를 이용하여, 분할된 pane 의 focus를 이동시키는 키를 추가한 것입니다.
하지만, 여기서 한 가지 불편한 사항이 나타납니다. 위의 동영상 처럼 4분할 된 경우, 왼쪽 상단 pane에서 우측 하단 pane으로 focus를 이동하고자 할 경우, mouse를 이용한다면 그냥 우측 하단 pane을 클릭하면 되지만, 키보드를 이용하여 이동할 때는 우선 Leader + B, RightKey를 눌러 focus를 왼쪽 상단에서 오른쪽 상단으로 옮기고, 다시 Leader + B , DownKey 를 눌러 오른쪽 하단으로 Foucs를 이동 시켜야 합니다.
좀 불편하죠, repeat 기능이 필요 합니다. 즉, Leader + B 키를 누른 후, active pane을 선택하겠다는 명령을 내린 후, 사용자가 원하는 만큼 방향키로 focus를 이동시킬 수 있다면 편리할 것 입니다.
:
:
local act = wezterm.action

config.leader = { mods = "CTRL", key = "b", timeout_milliseconds = 2000 }
config.keys   = {
  { mode = "LEADER", key = "'",           action = act.SplitVertical    { domain = "CurrentPaneDomain" } },
  { mode = "LEADER", key = ";",           action = act.SplitHorizontal  { domain = "CurrentPaneDomain" } },
  { mods = "LEADER", key  = "x",          action = act.CloseCurrentPane { confirm = false              } },
  { mods = "LEADER", key  = "LeftArrow",  action = act.ActivatePaneDirection "Left"  },
  { mods = "LEADER", key  = "RightArrow", action = act.ActivatePaneDirection "Right" },
  { mods = "LEADER", key  = "UpArrow",    action = act.ActivatePaneDirection "Up"    },
  { mods = "LEADER", key  = "DownArrow",  action = act.ActivatePaneDirection "Down"  },

  { mods = 'LEADER', key  = 'a',          action = act.ActivateKeyTable { name = 'activate_pane', one_shot = false,},},
}

config.key_tables = {
  activate_pane = {
    { key = 'LeftArrow',  action = act.ActivatePaneDirection 'Left'  },
    { key = 'RightArrow', action = act.ActivatePaneDirection 'Right' },
    { key = 'UpArrow',    action = act.ActivatePaneDirection 'Up'    },
    { key = 'DownArrow',  action = act.ActivatePaneDirection 'Down'  },
    -- Cancel the mode by pressing escape
    { key = 'Escape',     action = 'PopKeyTable' },
  },
}

return config;
위의 코드를 보면, Leader + a 를 누를 경우, activate_pane의 key_table를 이용하라고 선언하고 있습니다. 이때 속성으로 one_shot = false를 정의하고 있습니다. 이 말은 Leader + a를 누른 후, active_pane key table에 정의된 key들을 한 번 이상 누를 수 있다는 것 입니다. 즉, activate_pane 정의에 보면, Escape 키를 눌러 keytable을 나가도록 되어 있으므로 espace 키를 누르기 전까지는 계속 multiplexing 키인 상태가 유지되게 됩니다.
이렇게 설정하면, 이제 동일하게 왼쪽 상단에서 오른쪽 하단 pane으로 focus를 이동할 경우, Leader+B, a, LeftKey, DownKey, ESC 키 sequence로 원하는 목적을 달성할 수 있게 됩니다.
장점은 원하는 만큼 focus를 이동시킬 수 있다는 것이고, 단점은 반드시 ESC키를 눌러 종료를 시켜야 한다는 점 입니다.
따라서, 인접한 pane으로 Focus를 이동 시킬때는 Leader+방향키를 사용하고, 여러 pane을 걸처서 이동할 때는 Leader+a,방향키 를 이용하면 됩니다.
:
:
local act = wezterm.action

config.leader = { mods = "CTRL", key = "b", timeout_milliseconds = 2000 }
config.keys   = {
  { mode = "LEADER", key = "'",           action = act.SplitVertical    { domain = "CurrentPaneDomain" } },
  { mode = "LEADER", key = ";",           action = act.SplitHorizontal  { domain = "CurrentPaneDomain" } },
  { mods = "LEADER", key  = "x",          action = act.CloseCurrentPane { confirm = false              } },
  { mods = "LEADER", key  = "LeftArrow",  action = act.ActivatePaneDirection "Left"  },
  { mods = "LEADER", key  = "RightArrow", action = act.ActivatePaneDirection "Right" },
  { mods = "LEADER", key  = "UpArrow",    action = act.ActivatePaneDirection "Up"    },
  { mods = "LEADER", key  = "DownArrow",  action = act.ActivatePaneDirection "Down"  },

  { mods = 'LEADER', key  = 'a',          action = act.ActivateKeyTable { name = 'activate_pane', one_shot = false } },
  { mods = 'LEADER', key  = 'r',          action = act.ActivateKeyTable { name = 'resize_pane'  , one_shot = false } },
}

config.key_tables = {
  activate_pane = {
    { key = 'LeftArrow',  action = act.ActivatePaneDirection 'Left'  },
    { key = 'RightArrow', action = act.ActivatePaneDirection 'Right' },
    { key = 'UpArrow',    action = act.ActivatePaneDirection 'Up'    },
    { key = 'DownArrow',  action = act.ActivatePaneDirection 'Down'  },
    -- Cancel the mode by pressing escape
    { key = 'Escape',     action = 'PopKeyTable' },
  },
  resize_pane = {
    { key = 'LeftArrow',  action = act.AdjustPaneSize { 'Left',  1 } },
    { key = 'RightArrow', action = act.AdjustPaneSize { 'Right', 1 } },
    { key = 'UpArrow',    action = act.AdjustPaneSize { 'Up',    1 } },
    { key = 'DownArrow',  action = act.AdjustPaneSize { 'Down',  1 } },
    { key = 'Escape',     action = 'PopKeyTable' },
  },
}

return config;
위의 코드를 보면, Leader + r 키를 정의하고 있습니다. Leader + r를 누르면, resize_pane key table을 사용하는 것이고, activew_pane과 마찬가지로 ESC키를 누르기 전까지 반복적으로 원하는 만큼 키를 이용할 수 있습니다. 따라서, 키보드의 방향키를 이용하여, focused Pane의 크기를 원하는 만큼 조정할 수 있게 됩니다.
AdjustPaneSize { 'Left', 1 }, 에서 1은 resize의 단위로 1은 1 cell을 의미하면, 1글자 만큼의 폭 혹은 높이를 의미합니다.
:
:
local act = wezterm.action

config.leader = { mods = "CTRL", key = "b", timeout_milliseconds = 2000 }
config.keys   = {
  { mode = "LEADER", key = "'",           action = act.SplitVertical    { domain = "CurrentPaneDomain" } },
  { mode = "LEADER", key = ";",           action = act.SplitHorizontal  { domain = "CurrentPaneDomain" } },
  { mods = "LEADER", key  = "x",          action = act.CloseCurrentPane { confirm = false              } },
  { mods = "LEADER", key  = "LeftArrow",  action = act.ActivatePaneDirection "Left"  },
  { mods = "LEADER", key  = "RightArrow", action = act.ActivatePaneDirection "Right" },
  { mods = "LEADER", key  = "UpArrow",    action = act.ActivatePaneDirection "Up"    },
  { mods = "LEADER", key  = "DownArrow",  action = act.ActivatePaneDirection "Down"  },

  { mods = 'LEADER', key  = 'a',          action = act.ActivateKeyTable { name = 'activate_pane', one_shot = false } },
  { mods = 'LEADER', key  = 'r',          action = act.ActivateKeyTable { name = 'resize_pane'  , one_shot = false } },

  { mods = 'LEADER', key = ']',           action = act.RotatePanes "Clockwise"        },
  { mods = 'LEADER', key = '[',           action = act.RotatePanes "CounterClockwise" },
}

config.key_tables = {
  activate_pane = {
    { key = 'LeftArrow',  action = act.ActivatePaneDirection 'Left'  },
    { key = 'RightArrow', action = act.ActivatePaneDirection 'Right' },
    { key = 'UpArrow',    action = act.ActivatePaneDirection 'Up'    },
    { key = 'DownArrow',  action = act.ActivatePaneDirection 'Down'  },
    -- Cancel the mode by pressing escape
    { key = 'Escape',     action = 'PopKeyTable' },
  },
  resize_pane = {
    { key = 'LeftArrow',  action = act.AdjustPaneSize { 'Left',  1 } },
    { key = 'RightArrow', action = act.AdjustPaneSize { 'Right', 1 } },
    { key = 'UpArrow',    action = act.AdjustPaneSize { 'Up',    1 } },
    { key = 'DownArrow',  action = act.AdjustPaneSize { 'Down',  1 } },
    { key = 'Escape',     action = 'PopKeyTable' },
  },
}

return config;
위의 코드에서는 Leader + [ 와 Leader + ] 를 추가하여, RotatePane 기능을 추가했습니다.
말 그대로, 분할된 pane이 있을 때, fouced된 pane을 시계방향 혹은 반시계방향으로 one-time rotate 합니다. 이때 중요한 것은 pane의 외형적인 위치가 아닌 pane의 분할 생성 순으로 회전한다는 것입니다.
위의 동영상을 보면, 시계방향(Clockwise)으로 회전 시킬때, 왼쪽 상단 > 오른쪽상 단> 오른쪽 하단> 왼쪽 하단 순으로 회전할 것 같지만, 실제로는 왼쪽 상단 > 오른쪽 상단 > 왼쪽 하단 > 오른쪽 하단 순으로 회전하는 것을 알 수 있습니다. 이는 분할 시점에 각 pane의 생성 순서가 그렇게 설정되었기 때문입니다.
이것은 좀 직관적이지 않을 수 있는 문제입니다.
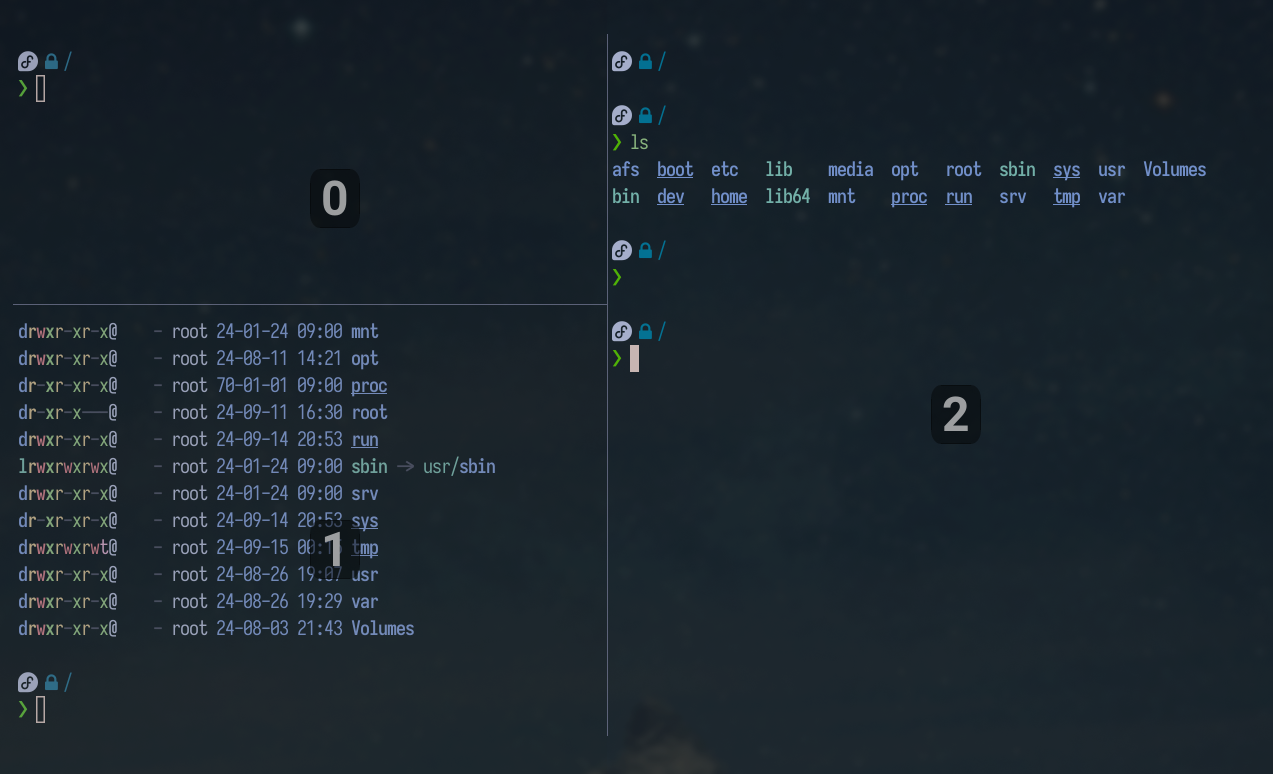
사용자 측면에서는 가시적으로 보이는 분할 구조에서 시계/반시계 방향으로의 회전을 의도하는데, 실제는 그렇치 않기 때문입니다. Pane의 번호를 확인하기 위해서는 아래의 코드를 추가해 줍니다.
config.keys = {
:
  { mods = 'LEADER', key = 'p',           action = act{PaneSelect={alphabet="0123456789"}}},
:
}
Leader + p 를 누르게 되면, 각 분할된 pane이 중앙에 pane 번호가 표시가 됩니다. 해당 번호를 누르면 focus가 이동하고 종료되지만, 그냥 확인용이라면 ESC키를 눌러 종료 시키면 됩니다.
아무튼, rotate를 one-time 이 아닌, repeat 기능을 부여하기 위해 아래의 코드를 추가하여 완성합니다.
:
:
local act = wezterm.action

config.leader = { mods = "CTRL", key = "b", timeout_milliseconds = 2000 }
config.keys   = {
  { mode = "LEADER", key = "'",           action = act.SplitVertical    { domain = "CurrentPaneDomain" } },
  { mode = "LEADER", key = ";",           action = act.SplitHorizontal  { domain = "CurrentPaneDomain" } },
  { mods = "LEADER", key  = "x",          action = act.CloseCurrentPane { confirm = false              } },
  { mods = "LEADER", key  = "LeftArrow",  action = act.ActivatePaneDirection "Left"  },
  { mods = "LEADER", key  = "RightArrow", action = act.ActivatePaneDirection "Right" },
  { mods = "LEADER", key  = "UpArrow",    action = act.ActivatePaneDirection "Up"    },
  { mods = "LEADER", key  = "DownArrow",  action = act.ActivatePaneDirection "Down"  },

  { mods = 'LEADER', key  = 'a',          action = act.ActivateKeyTable { name = 'activate_pane', one_shot = false } },
  { mods = 'LEADER', key  = 'r',          action = act.ActivateKeyTable { name = 'resize_pane'  , one_shot = false } },
  { mods = 'LEADER', key  = 'c',          action = act.ActivateKeyTable { name = 'rotate_pane'  , one_shot = false } },

  { mods = 'LEADER', key = ']',           action = act.RotatePanes "Clockwise"        },
  { mods = 'LEADER', key = '[',           action = act.RotatePanes "CounterClockwise" },

  { mods = 'LEADER', key = 'p',           action = act{PaneSelect={alphabet="0123456789"}}},
}

config.key_tables = {
  activate_pane = {
    { key = 'LeftArrow',  action = act.ActivatePaneDirection 'Left'  },
    { key = 'RightArrow', action = act.ActivatePaneDirection 'Right' },
    { key = 'UpArrow',    action = act.ActivatePaneDirection 'Up'    },
    { key = 'DownArrow',  action = act.ActivatePaneDirection 'Down'  },
    -- Cancel the mode by pressing escape
    { key = 'Escape', action = 'PopKeyTable' },
  },
  resize_pane = {
    { key = 'LeftArrow',  action = act.AdjustPaneSize { 'Left',  1 } },
    { key = 'RightArrow', action = act.AdjustPaneSize { 'Right', 1 } },
    { key = 'UpArrow',    action = act.AdjustPaneSize { 'Up',    1 } },
    { key = 'DownArrow',  action = act.AdjustPaneSize { 'Down',  1 } },
    { key = 'Escape',     action = 'PopKeyTable' },
  },
  rotate_pane = {
    { key = 'RightArrow', action = act.RotatePanes "CounterClockwise" },
    { key = 'UpArrow',    action = act.RotatePanes "CounterClockwise" },
    { key = 'LeftArrow',  action = act.RotatePanes "Clockwise"        },
    { key = 'DownArrow',  action = act.RotatePanes "Clockwise"        },
    { key = 'Escape',     action = 'PopKeyTable' },
  },
}

return config;
Leader+B,c 를 누르고, 좌/우 방향키를 이용하면, 원하는 만큼 rotate를 할 수 있습니다. 물론, 종료는 ESC키를 눌러줘야 합니다.
Rotate를 제외하고, Pane 선택, Pane의 크기를 변경하는 것은 mouse를 이용할 수 있습니다.
자, 이렇게 해서 wezterm 의 간단한 기본 설정과 함께, multipluxing 기능을 활용하기 위한 keymap 정의까지 알아 봤습니다. 아래는 전체 설정파일의 내용 입니다.
local wezterm = require 'wezterm'
local config = wezterm.config_builder()

-- GPU backend
local gpus = wezterm.gui.enumerate_gpus()
config.webgpu_preferred_adapter  = gpus[0]
config.front_end = "WebGpu"
config.aimation_fps = 60

-- Decoration
config.window_decorations = "NONE"
config.window_background_opacity = 0.3

config.enable_tab_bar = false
config.warn_about_missing_glyphs = false
config.window_close_confirmation = "NeverPrompt"

config.window_padding = {
  left   = '20px',
  right  = '20px',
  top    = '20px',
  bottom = '50px',
}


-- Custom Theme
local custom_catppuccin      = wezterm.color.get_builtin_schemes()["Catppuccin Macchiato"]
custom_catppuccin.background = '#293643'
config.color_schemes         = { ['Custom_Catpuccin'] = custom_catppuccin }
config.color_scheme          = 'Custom_Catpuccin'

-- Font
config.font = wezterm.font (
  'Sarasa Mono K Nerd Font',
  {
    weight='Regular',
    italic = false
  }
}
config.font_size = 15
config.cell_width = 0.9
config.line_height = 1.05


-- Muxtiplexing keymaps
local act = wezterm.action

config.leader = { mods = "CTRL", key = "b", timeout_milliseconds = 2000 }
config.keys   = {
  { mode = "LEADER", key = "'",           action = act.SplitVertical    { domain = "CurrentPaneDomain" } },
  { mode = "LEADER", key = ";",           action = act.SplitHorizontal  { domain = "CurrentPaneDomain" } },
  { mods = "LEADER", key  = "x",          action = act.CloseCurrentPane { confirm = false              } },

  { mods = "LEADER", key  = "LeftArrow",  action = act.ActivatePaneDirection "Left"  },
  { mods = "LEADER", key  = "RightArrow", action = act.ActivatePaneDirection "Right" },
  { mods = "LEADER", key  = "UpArrow",    action = act.ActivatePaneDirection "Up"    },
  { mods = "LEADER", key  = "DownArrow",  action = act.ActivatePaneDirection "Down"  },

  { mods = 'LEADER', key  = 'a',          action = act.ActivateKeyTable { name = 'activate_pane', one_shot = false } },
  { mods = 'LEADER', key  = 'r',          action = act.ActivateKeyTable { name = 'resize_pane'  , one_shot = false } },
  { mods = 'LEADER', key  = 'c',          action = act.ActivateKeyTable { name = 'rotate_pane'  , one_shot = false } },

  { mods = 'LEADER', key = ']',           action = act.RotatePanes "Clockwise"        },
  { mods = 'LEADER', key = '[',           action = act.RotatePanes "CounterClockwise" },

  { mods = 'LEADER', key = 'p',           action = act{PaneSelect={alphabet="0123456789"}}},
}

config.key_tables = {
  activate_pane = {
    { key = 'LeftArrow',  action = act.ActivatePaneDirection 'Left'  },
    { key = 'RightArrow', action = act.ActivatePaneDirection 'Right' },
    { key = 'UpArrow',    action = act.ActivatePaneDirection 'Up'    },
    { key = 'DownArrow',  action = act.ActivatePaneDirection 'Down'  },
    -- Cancel the mode by pressing escape
    { key = 'Escape',     action = 'PopKeyTable' },
  },
  resize_pane = {
    { key = 'LeftArrow',  action = act.AdjustPaneSize { 'Left',  1 } },
    { key = 'RightArrow', action = act.AdjustPaneSize { 'Right', 1 } },
    { key = 'UpArrow',    action = act.AdjustPaneSize { 'Up',    1 } },
    { key = 'DownArrow',  action = act.AdjustPaneSize { 'Down',  1 } },
    { key = 'Escape',     action = 'PopKeyTable' },
  },
  rotate_pane = {
    { key = 'RightArrow', action = act.RotatePanes "CounterClockwise" },
    { key = 'LeftArrow',  action = act.RotatePanes "Clockwise"        },
    { key = 'Escape',     action = 'PopKeyTable' },
  },
}

return config;'Terminal' 카테고리의 다른 글
| kitty terminal, neovide와 유사한 cursor trail 기능 추가 (0) | 2024.10.22 |
|---|---|
| Lo-Fi 음악을 가장 쉽고 간편하게 듣는 방법 - lowfi (2) | 2024.10.04 |
| Linux, Chromium 에서 가끔씩 한글의 자모가 분리되는 문제를 해결하는 방법 (0) | 2024.09.11 |
| zsh, powerlevel10k 프롬프트 사용 시, 터미널 창 resize에 따라 화면이 깨지는 현상 방지법 (0) | 2024.09.09 |
| 터미널 File Manager의 떠오르는 샛별 - Yazi (1) | 2024.09.06 |


